Windows Vista has been taking a lot of heat, and many ask why go to Vista when XP works so well. One of the most compelling reasons to move to Vista for myself is Internet Information Services (IIS) 7. With Service Pack 1 for Vista the same kernel is used as that for Windows Server 2008. So with Vista you have IIS 7 running under the same kernel as Server 2008. The only limitation to IIS 7 running under Vista is that it will only return a finite number of simultaneous requests (3 for the basic editions of Vista, and 10 for Business and Ultimate). This limitation may sound more restricting than it really is. Considering a web response can take say a tenth of a second, and users may have a think time of fifteen seconds between requests that's 150 concurrent users on your website before you have issues. With that in mind, a small scale web site can be hosted from a home machine on a half descent network. My aim in this post is to outline the steps to setup the self hosted website.
The steps are rather simple and involve doing the following
- Installing Internet Information Services (IIS) 7 on the machine.
- Installing Microsoft SQL Server Express.
- Setting up the web site locally.
- Routing public requests to the computer.
- Opening the port through windows firewall.
- Routing the port to IIS
- Registering a name server.
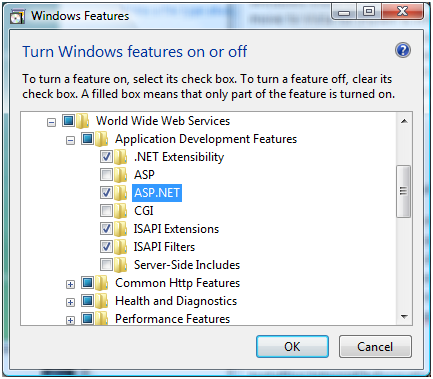
Installing Internet Information Services (IIS 7)
I like to have the website running locally before I worry about the public networking so things such as development and testing can be done a priori. To do this, first IIS must be installed. This is as simple as checking off IIS inside of windows components from "turn windows features on or off" within programs of the control panel. You may want to add the extras at your discretion if you want things like CGI. For this guide we will install an open source ASP.NET blog application so go ahead and expand Application Development Features and check of .NET Extensibility and ASP.NET which will add the ISAPI items below. Click ok and wait 'several' minutes and IIS will have been installed. Not so bad so far right?
Installing Microsoft SQL Server Express
This step is not necessary but many applications utilize a database server, and with ASP.NET SQL Server is the flavor of choice. Blog engines general can run off of a database or within XML files locally. The choice is yours, but I like to keep my data in an easily queried location such as SQL Server. SQL Server Express 2005, http://www.microsoft.com/sql/editions/express/default.mspx, is completely free and offers all of the features you may need for a home website. The installation is painless and simple, just download the installer and click through it.
In order to manage the SQL Databases within the Server download a copy of SQL Server Management Studio Express, http://www.microsoft.com/downloads/details.aspx?FamilyID=c243a5ae-4bd1-4e3d-94b8-5a0f62bf7796&displaylang=en, which is also free. With this you can now create and develop database applications if you so desired. But for now we will just want to create a new database for the website. Do this by starting SQL Studio Express and connect to the local instance on the machine. This will be the machine name and Default Instance unless you changed it during the installation.
To create the database for the blog, right click the server instance's databases folder and select new database. In here, enter a database name, such as 'blog'. The defaults should suffice; click OK to create the database.
Now run the Surface Area Configuration application which is within the SQL 2005 folder off of the start menu. This will configure what protocols and ports are 'watched' by the SQL Server. We need to enable 'named pipes' so that the website can connect to the database. Do this by opening "Surface Area Configuration for Services and Connections" the clicking on "Remote Connections" on the left side of the window. Now on the dialogue select "Local and remote" and "Using both TCP/IP and named pipes". Click Apply, and then bring Studio Express back up. We need to allow the SQL Logins to the server instance. To do this, right click the server and choose properties. In the properties dialogue, navigate to security and change server authentication to "SQL Server and Windows Authentication Mode" to resolve the "Not associated with a trusted SQL Server connection" errors. Now restart the SQL Server, this can be done by running "services.msc" and restart the SQL Server service.
There is one final step in setting up the local SQL Server. We must add a user so that the website may login. To allow this user to connect to the database we need to create a login account for it, and then a user for it within the database we have created. This way the connection can be made, and then rights to the database will be granted. Back in the SQL Studio Express, expand the Security folder under the SQL Instance. Right click logins and create a new login. Under login name enter something such as "WEB_USER" and then select SQL Server Authentication and enter a strong password. Uncheck enforce password policy, as the user will not be able to do things such as change their password on first login or expiration. For the default database change the value to the database name, such as "blog" and click okay. Now expand databases out and then expand the database out and its security tab. Then right click users and add a new user. For the user name type something such as "WEB_USER" and then for the login name enter "WEB_USER" or the user name for the user previously created. Then under "Database role membership" check of "db_owner" and click OK.
Setting up a website locally
Now we start the fun part, setting up our website within IIS. Open up the IIS management console by running 'inetmgr' from start run (windows key + r) and then expanding out the websites. The first thing I do is disable the default website, and add a new one.
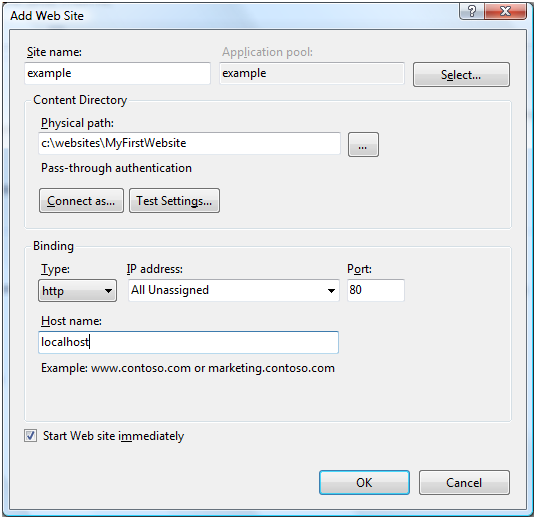
We will want to create a new website for the blog, so right click and add new. The name (description) assigned to the website is not important as long as you can recognize it. The two important items on this form are the home directory and the host headers for the application. The home directory is where the websites root is physically located on your computer. This is important; it must be somewhere you consider public! Any files in this directory will be exposed to the world at large. I like to create a new low level folder in say c:\websites\MyFirstWebsite. Create a folder in this manor and then add the path to the root directory.
The host header is how IIS maps a domain name (host header) to a particular website. If you put something such as contoso.com in the host header, and requests along a port served by IIS with that host header will be sent this website which will be running out of the home directory. So in short, the home directory attaches the website to your file system while the host header attaches your website to the internet at large. For now as we are working locally just put localhost. Click okay and the new website will have been created.
Each website with IIS7 by default is run in its own Application Pool. This is great, and prevents the issues with sharing application pools across different sites and in particular with different versions of the framework. However the new application pools are created in integrated mode. This normally is fine, but if the application does certain things it may crash to a "Request is not available in this context". To prevent this open the application pool tab and find the new application pool, it will be named the same as the website and double click it. Then change the mode from integrated to classic. Note if you are running 64 bit vista you will want to go into advanced and enable 32 bit applications if you receive 'not a valid win32 application'.
We now need to install ASP.NET version 2.0 for IIS. This is done by start an administrator rights instance of command prompt (run "CMD") and then navigating to Windows\Microsoft.NET\Framework\v2.0.50727\ and then running aspnet_regiis.exe –i.
The website we are installing uses ASP.NET AJAX extensions, so download extensions from here, http://www.asp.net/ajax/downloads/. Then run the installer and click through it. This will make a reference to "System.Web.Extensions" valid within ASP.NET 2.0; note that in 3.5 the extensions are built into the framework.
Installing SubText
Now we will for example purposes install Sub Text, a Blog engine I am particularly fond of. Download the install version from http://subtextproject.com/ and extract the files to the website's root directory created earlier. The blog is now installed within the website, but it needs a reference to the SQL Database. To do this open a file in the websites root named web.config with notepad and find a value in the xml file named connection string. We are going to edit the value on this so that the website will be able to connect to the database we previous setup. The default connection string already points to a local database server, so just change the "database=SubtextData_1.9" to match the database name, such as "database=blog". Then change the trusted connection value to false. Now add two new properties to the connection string, the username and password. The fields are delaminated by semicolons, so add it in the following format "user id=web_user; password=thestrongpass". The last step is to change the server value from localhost to the instance name. The instance name is easily grabbed from the login area on SQL Studio Express, and is in the form MACHINENAME\SQLEXPRESS.
Now simply navigate to localhost to run through sub text's installer. If you have any issues sub text has some documentation http://subtextproject.com/Home/About/Docs/Installation/tabid/111/Default.aspx.
Routing Public Traffic
This step is a bit trickier as the exact method is dependent upon which hardware you have and whom you use as an ISP. Most home ISPs block incoming requests on port 80 to prevent home users from hosting web sites. Typically port 80 and 21 (FTP) or the common ports blocked, the solution is to simply host on a separate port. This does have the side effect of an unconventional URL for the website. For example if you chose to host upon port 8080 (a common alternative) a request might look like http://127.0.0.1:8080.
With that addressed, we now need to have the traffic routed to the home machine. If you have a modem (cable/DSL/etc) connected directly to your computer you can likely skip this step as all traffic is routed directly to the computer. If however you use a router to support many computers on a local LAN or WAN you will need to configure the port forwarding. Many routers have the option of setting the port forwarding under gaming or some other common use label. But in general the process is to first make a MAC reservation for the computer. This will reserve an IP address for the computer and will prevent the DHCP server from assigning new IP addresses over time. With this done forward the port you would like to use to the computer. Now incoming traffic to the switch on that specific port will be forwarded to the computer. For the details of this process see the documentation on your router.
Disabling Windows Firewall
Disabling the windows firewall is a straightforward step. Open control panel and select the networking item then click allow programs through. Within the dialogue choose add a port, and add the port you have configured on the router. This will pass the port on through the windows firewall. If another firewall is installed as well such as Norton or Zone Alarm be sure to perform the equivalent action there.
Routing the port to IIS
With the custom port being routed to the machine and allowed by the firewall(s), change the binding on the website to use the port, this is done by opening the IIS manager (start, run inetmgr) and then right click the website and editing the bindings. Simply change port 80 to the port you added, or add an additional port.
Registering the Name server
In order to have a domain name (such as example.com) instead of an IP address (such as 192.168.0.1) a dynamic DNS must be setup. One provider of a dynamic DNS is DynDNS, http://www.dyndns.com/services. If your router supports a dynamic DNS it can update DynDNS whenever the IP Address 'revolves' so that your domain name remains valid. Once you have the domain name resolving to your ip address, be sure to add it to the "Host Name" for the website if you are not catching all requests with the website.
Once setup, you will be able to access your site by the name, but you will still have to specify the port if it was anything but port 80. This is done with the following format http://my.example.com:8080
Summary
You should now have a blog hosted on your home machine made available from any public location. If you find any errors or points of confusion in the guide, please leave some feedback and I will respond and update the guide as necessary.